ASP.NET Core + Angular 2 template for Visual Studio
Now that ASP.NET Core, Angular 2, and TypeScript 2 have all shipped final versions, it’s a great time to combine them all into one powerful rich web application platform.
For many months, I’ve been working with some great community contributors on our GitHub repo to build supporting libraries, packages, and ultimately what we hope is the ideal starting-point template for such applications. As well as just the basics of hosting a TypeScript-coded Angular 2 site on ASP.NET Core, the template includes:
- Server-side prerendering, so your UI can show up very quickly, even before the browser downloads your JavaScript code
- Webpack middleware integration, so that during development, you don’t need to keep rebuilding your client-side application, or even have to run a watcher tool in the background
- Hot module replacement, so that during development, whenever you edit a TypeScript file, a CSS file, or other client-side resource, your changes are pushed into the browser immediately without reloading the page (so you don’t lose your active debugging session, etc.)
- Fast and lean builds. In development, you don’t have to wait for webpack to re-analyse third-party code each time you change your own code, because we factor third-party code out into a separate bundle. Also, in development, your ultra-fast builds include full source maps to aid debugging, whereas in production you get minimal minified output. During publishing to production, it automatically uses production builds.
What if you want to use a different framework? Do you prefer React, React+Redux, or Knockout? We’ve also made equivalent Yeoman templates for those.
What if you want to use a different IDE or develop on Linux or OS X macOS? If you’re not using Visual Studio on Windows, that’s fine: use our Yeoman generator to get equivalent Angular 2, React, React+Redux, or Knockout projects that work with VS Code or any other editor on any operating system. .NET Core is fully cross-platform, after all.
Installation
First make sure you have installed these prerequisites. Things will not work without them!
- Visual Studio 2015 Update 3. Note that Update 2 is not enough. You need Update 3, because it fixes some issues with NPM, plus it’s a prerequisite for TypeScript 2.0.
- .NET Core 1.0.1
- TypeScript 2.0 for Visual Studio 2015. If Visual Studio keeps complaining
Cannot find name 'require', it’s because you forgot to install this. - Node.js version 4 or later. We temporarily don’t support Node 0.x because of this issue, but might re-add support for Node 0.x in the future. To check your Node version, run
node -vin a command prompt.
Now you’ve checked the prerequisites are installed, just download and install the ASP.NET Core Template Pack extension.

Creating and running a project
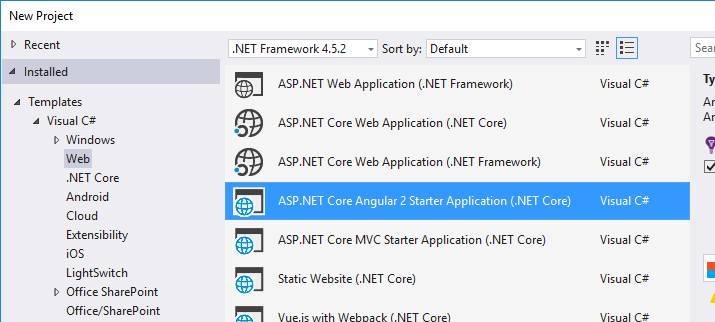
When you have the prerequisites listed above, and have installed the ASP.NET Core Template Pack extension, you can go to Visual Studio’s File New Project menu, expand the Web category, and pick ASP.NET Core Angular 2 Starter Application (.NET Core):
Give your project a name and click OK.
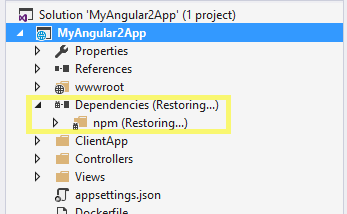
Now, wait patiently as Visual Studio restores all the Node.js (NPM) dependencies! This can take several minutes if your internet connection isn’t screamingly fast.
At this point, you’re likely to encounter what looks like a problem, but actually isn’t. When Visual Studio finishes restoring the NPM dependencies, it will show “Dependencies - not installed”:
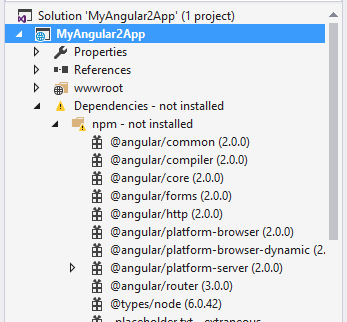
However, VS is wrong! The fact that you see the packages listed with their version numbers like that means they are installed. You can ignore the “not installed” message in this particular case, but if it bothers you enough, you can follow Hanselman’s steps to fix it.
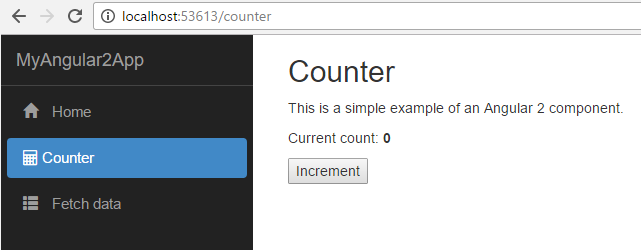
You can now run your project. Press Ctrl+F5 to launch without debugging (like any other VS project), or tap on the “Play” icon in the toolbar (labelled IIS Express) if you’re not into keyboard shortcuts. It will appear:

Server-side prerendering
Have a click around the starter site. You’ll find a couple of examples of simple components built with Angular 2. It doesn’t seem like much is going on, but there are some cool things happening behind the scenes.
The first thing is that, even though this is an Angular 2 app that normally runs in the browser, your ASP.NET Core server can run it on the server too, so it just sends plain HTML down to the browser that doesn’t even need JavaScript to be displayed.
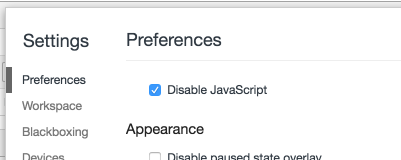
To prove this to yourself, try disabling JavaScript in your browser altogether (for Chrome users, open the Developer Tools, press F1, check the Disable JavaScript box, then reload the page while leaving the Developer Tools open):
You’ll find that your application appears just the same as before, even though your browser can’t execute any client-side code. You can still navigate around by clicking the sidebar links. But note: navigation is the only thing that will work, because that’s a basic HTML feature. On the “counter” screen, you’ll find the counter button does nothing if you click it, because that’s wired up to a JavaScript event handler, and you don’t have JavaScript right now.
So what’s the point of server-side prerendering?
The point isn’t really to support browsers that don’t have JavaScript enabled. That would only work in the extreme case where you application has no functionality besides navigation (and in that case, why are you building it as a SPA?).
The real benefits are:
- It gives a dramatic improvement to perceived performance for your users. Even if they are on a slow device and a slow internet connection, they get to see your application’s UI in a fraction of a second and perhaps read whatever information you’re showing them. In the background, your potentially large bundle of JavaScript is downloading, parsing, and executing in the background, and then automatically takes over to make your application fully functional on the client. This is much better than just showing a blank screen while the application loads.
- It supports web crawlers that might not execute JavaScript. As far as any search engine is concerned, you are just returning plain old HTML, so your site can be crawled and indexed in the normal way.
There are limitations with server-side rendering. Notably, your application code can’t just assume it always runs in a browser. If you try to reference the browser’s DOM directly, you’ll get an error like window is undefined when it runs server-side. Fortunately that’s rarely a problem, because in a well-architected Angular app (or React, etc.), the framework really doesn’t want you to mess with the DOM directly anyway, so you shouldn’t be assuming browser primitives regardless of server-side rendering.
If you don’t want to use server-side prerendering for some reason, disable it by removing the asp-prerender-module attribute from the <app> element in Views/Home/Index.cshtml.
Webpack integration
The code in this application is written in TypeScript. That means you need a build step before it can be run. The same would be true if you used SASS (compiles to CSS) or wanted your library code to be bundled and minified.
The dominant build system for modern JavaScript applications today is Webpack. It’s like Grunt or Gulp, but for 2016. It handles TypeScript compilation, bundling and minification, and about a million other things that people have contributed plugins for. We use it in the template, and it enables a couple of cool features:
Webpack dev middleware
Normally, whenever you change one of your TypeScript files, you’d have to run webpack on the command line to regenerate the compiled JavaScript files under wwwroot/dist. But the webpack dev middleware feature saves you the trouble of doing that.
If your application is running in development mode, which it is by default when you launch from Visual Studio, then Webpack is running in the background and intercepting any requests for files under http://yoursite/dist. It handles any such request by returning the compiled file that would be at that location, accounting for any changes you’ve made to the source files.
Because the Webpack compiler remains active in memory, it’s able to produce incrementally compiled updates in a tiny fraction of the usual build time (usually on the order of a few tenths of a second), so your development experience isn’t interrupted as it otherwise would be.
Hot module replacement (HMR)
You know what an incredible drag it is to have to reload your page each time you change something? Well, I admit it’s not the pinnacle of human suffering, but it is a waste of time if you had a debugging session in progress, or otherwise had state in the browser’s memory that will get lost on reload.
HMR solves this. It’s enabled by default when you’re running in development mode, and it watches for any changes to your Angular application source files (TypeScript, HTML, CSS, etc.). When something changes, it does a fast incremental compilation, using the in-memory Webpack compiler instance, and pushes the changes to any active browser windows. Your application will update on the fly, without reloading the page.
To see this working, open your browser’s debug console while it’s in development mode (e.g., launched from Visual Studio). You’ll see this message:
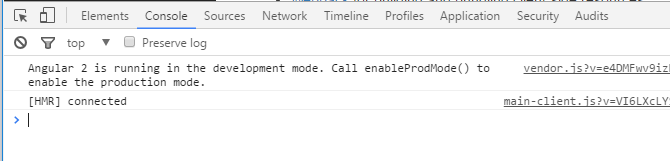
See [HMR] connected? That means it’s ready to receive changes. Try editing one of your source files. For example, edit ClientApp/app/components/home/home.component.html as in this beautiful animated GIF:
The same works if you edit CSS or even images that have been loaded via Webpack require statements.
Configuring webpack
You’ll find the Webpack configuration files in the project root, called webpack.config.js and webpack.config.vendor.js. Now, Webpack is a powerful and sophisticated tool, enough to write whole books about. So don’t be disappointed if it’s not all obvious at first glance. Do be prepared to take some time to learn Webpack if you really want to customise it.
The only notable thing about how it’s set up in this project is that we’ve split third-party dependency code (i.e., “vendor” code) into a separate bundle, controlled by the webpack.config.vendor.js file. This makes rebuilds much faster, because Webpack doesn’t have to re-analyze large libraries like Angular 2 on every build.
You can add extra third-party dependencies to your webpack.config.vendor.js, as in the example below. Whenever you do, run webpack --config webpack.config.vendor.js on the command line to update the vendor bundle. If you need to, install the Webpack command-line tool first by running npm install -g webpack.
Adding third-party libraries
Most JavaScript libraries these days are distributed on NPM. Such libraries are pretty easy to include in your project (assuming they work with the other technologies you’ve chosen, such as Angular 2).
For example, let’s say you want to use Font Awesome, the “iconic font and CSS toolkit”. In Visual Studio, open your package.json file, and add "font-awesome": "^4.6.3" to the list. Visual Studio will auto-complete the package name and suggest the current version number to you. Now save your edited package.json file, and VS will fetch and install your new NPM dependency. Alternatively, you can run npm install --save font-awesome on the command line.

Now let’s add it to the vendor bundle. Open your webpack.config.vendor.js file, and inside the array called vendor (the one that includes '@angular/common', '@angular/compiler', etc.), add font-awesome/css/font-awesome.css. The order doesn’t matter, but alphabetical is nice:
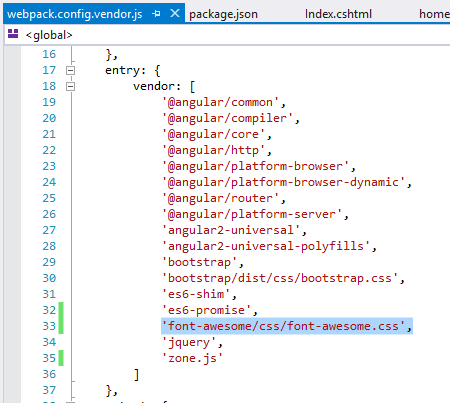
How did we know to reference font-awesome/css/font-awesome.css? Well, if it was a JavaScript library, you’d just reference the package name (e.g., moment for Moment.js). But since what we want from font-awesome is a CSS file (and other things referenced by that CSS file, such as fonts or images), we give the path to the CSS file we want, as specified by the Font Awesome docs.
Next, it’s important to rebuild your wwwroot/dist/vendor.js bundle. We don’t rebuild this all the time automatically, because it takes a little while (like 10 seconds maybe). So in a command prompt, at your project root, run webpack --config webpack.config.vendor.js. If you don’t already have the webpack tool installed, you’ll need to run npm install -g webpack first.
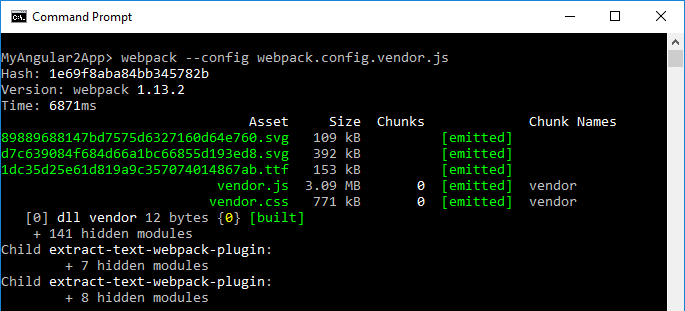
Now Font Awesome’s CSS file (and its other dependencies, such as fonts or SVG files) is in your vendor bundle, so now you can just use it. For example, in ClientApp/app/components/navmenu/navmenu.component.html, you could use Font Awesome’s “calculator” icon:
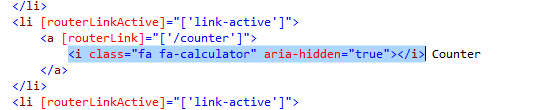
… and it will show up on your page:
Note: If you get a message like Uncaught ReferenceError: vendor_1e69f8aba84bb345782b is not defined, it’s because either (1) you forgot to run webpack --config webpack.config.vendor.js or (2) you did so, but haven’t yet restarted your application. Because vendor file changes are infrequent and take some processing time, we don’t do rebuild them automatically or integrate them with HMR, so on the rare occasions where you modify your vendor bundle contents, you will need to rebuild it yourself and restart your ASP.NET application.ke
Publishing to Azure
Before you can deploy, you need to work around a bug in the template that we’ll fix very soon. We (i.e., me) forgot to include webpack-dev-externals in the list of NPM dependencies, and you do need it during publishing.
Go to package.json, and in the list of dependencies, add "webpack-node-externals": "^1.4.3".
Now let’s deploy
You can publish an application created with this template to any ASP.NET Core host using any normal deployment mechanism. For those who specifically want to deploy to Azure, here’s one way to do it.
First, from the Azure portal, create a new Web App.
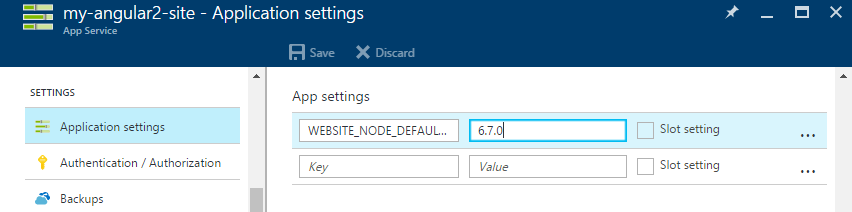
Important! Specify a Node.js version If you don’t, it will use an old version, and deployment will fail. Go to the Application settings pane for your new Web App, and you’ll see a config entry called WEBSITE_NODE_DEFAULT_VERSION. Edit the value, entering a recent Node.js version such as 6.7.0:
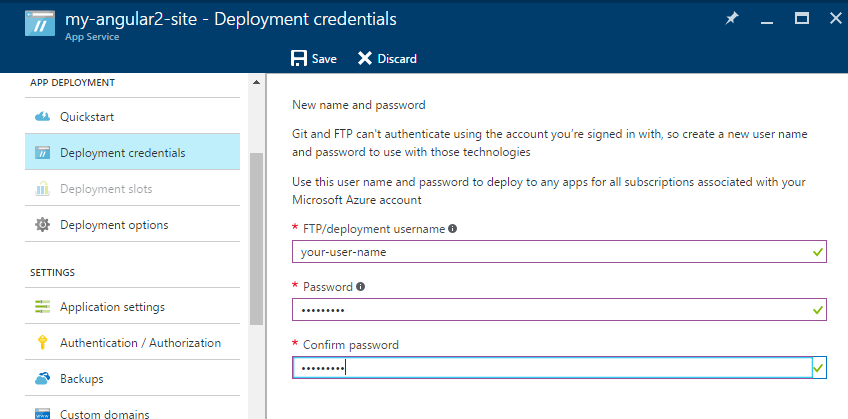
After saving that change, go to the Deployment Credentials config pane, and enter some new credentials.
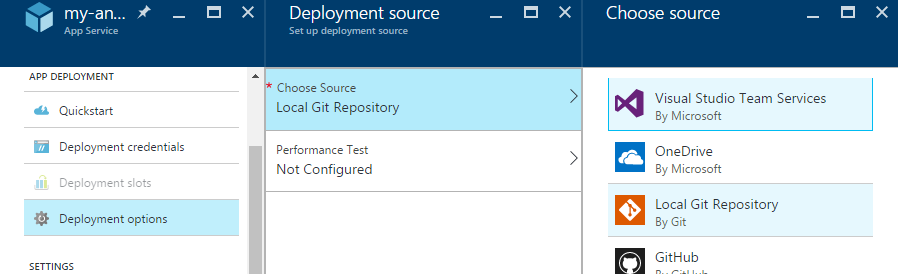
Then, under Deployment options, set up Local Git repository.
After this, when you go to Overview, you’ll be able to copy your new Git clone url.

Back in a command prompt at the root of your Angular 2 app (the directory containing ClientApp, Startup.cs, etc.), initialize a Git repo:
git init
git add .
git commit -m "My first commit"
You can now add Azure as a remote for your Git repo, using the “Git clone url” you got from the Azure portal earlier:
git remote add azure https://your-user-name@my-angular2-site.scm.azurewebsites.net:443/my-angular2-site.git
Obviously, don’t just copy and paste what you see above exactly - replace the URL with the one for your own Web App.
Now you can push the current version of your app to Azure:
git push --set-upstream azure master
Enter the credentials you chose a moment ago, then sit back and wait while the deployment proceeds. The first deployment will take a few minutes. When it’s finished, visit your site’s URL and be delighted with your magnificent creation!
Feedback
If you have general comments on the scope and direction of this project, please post below! I’d love to know how useful (or not) this is to you. As I mentioned above, if you’re looking for similar project templates for React, React+Redux, or Knockout, or if you’re not using Windows or Visual Studio, you’re not being left out: you can use our Yeoman generator instead.
Or, if you encounter any specific issues and think you’ve found a bug, please file an issue on Github (please don’t post it as a comment to this blog post)