Integrating FluentValidation with Blazor
An example of integrating a custom third-party validation system with Blazor's forms
FluentValidation is a popular validation library for .NET Core by Jeremy Skinner. It has some advantages over .NET Core’s built-in DataAnnotations validation system, such as a richer set of rules, easier configuration, and easier extensibility.
Blazor ships with built-in support for forms and validation, but Blazor doesn’t know about FluentValidation, and FluentValidation doesn’t know about Blazor. So, how can we make them work nicely together?
A simple validation example
With FluentValidation, you define a validator class for the model types you want to validate. For example, if you have this Customer class:
public class Customer
{
    public string FirstName { get; set; }
    public string LastName { get; set; }
}
… then you might define a CustomerValidator class as follows:
public class CustomerValidator : AbstractValidator<Customer>
{
    public CustomerValidator()
    {
        RuleFor(customer => customer.FirstName).NotEmpty().MaximumLength(50);
        RuleFor(customer => customer.LastName).NotEmpty().MaximumLength(50);
    }
}
More interesting rules are possible, but let’s start with this. Now say you want to have a UI for creating Customer instances in Blazor. You could use the following in a .razor component:
<EditForm Model="customer" OnValidSubmit="SaveCustomer">
    <FluentValidator TValidator="CustomerValidator" />

    <h3>Your name</h3>
    <InputText placeholder="First name" @bind-Value="customer.FirstName" />
    <InputText placeholder="Last name" @bind-Value="customer.LastName" />
    <ValidationMessage For="@(() => customer.FirstName)" />
    <ValidationMessage For="@(() => customer.LastName)" />

    <p><button type="submit">Submit</button></p>
</EditForm>

@code {
    private Customer customer = new Customer();

    void SaveCustomer()
    {
        Console.WriteLine("TODO: Actually do something with the valid data");
    }
}
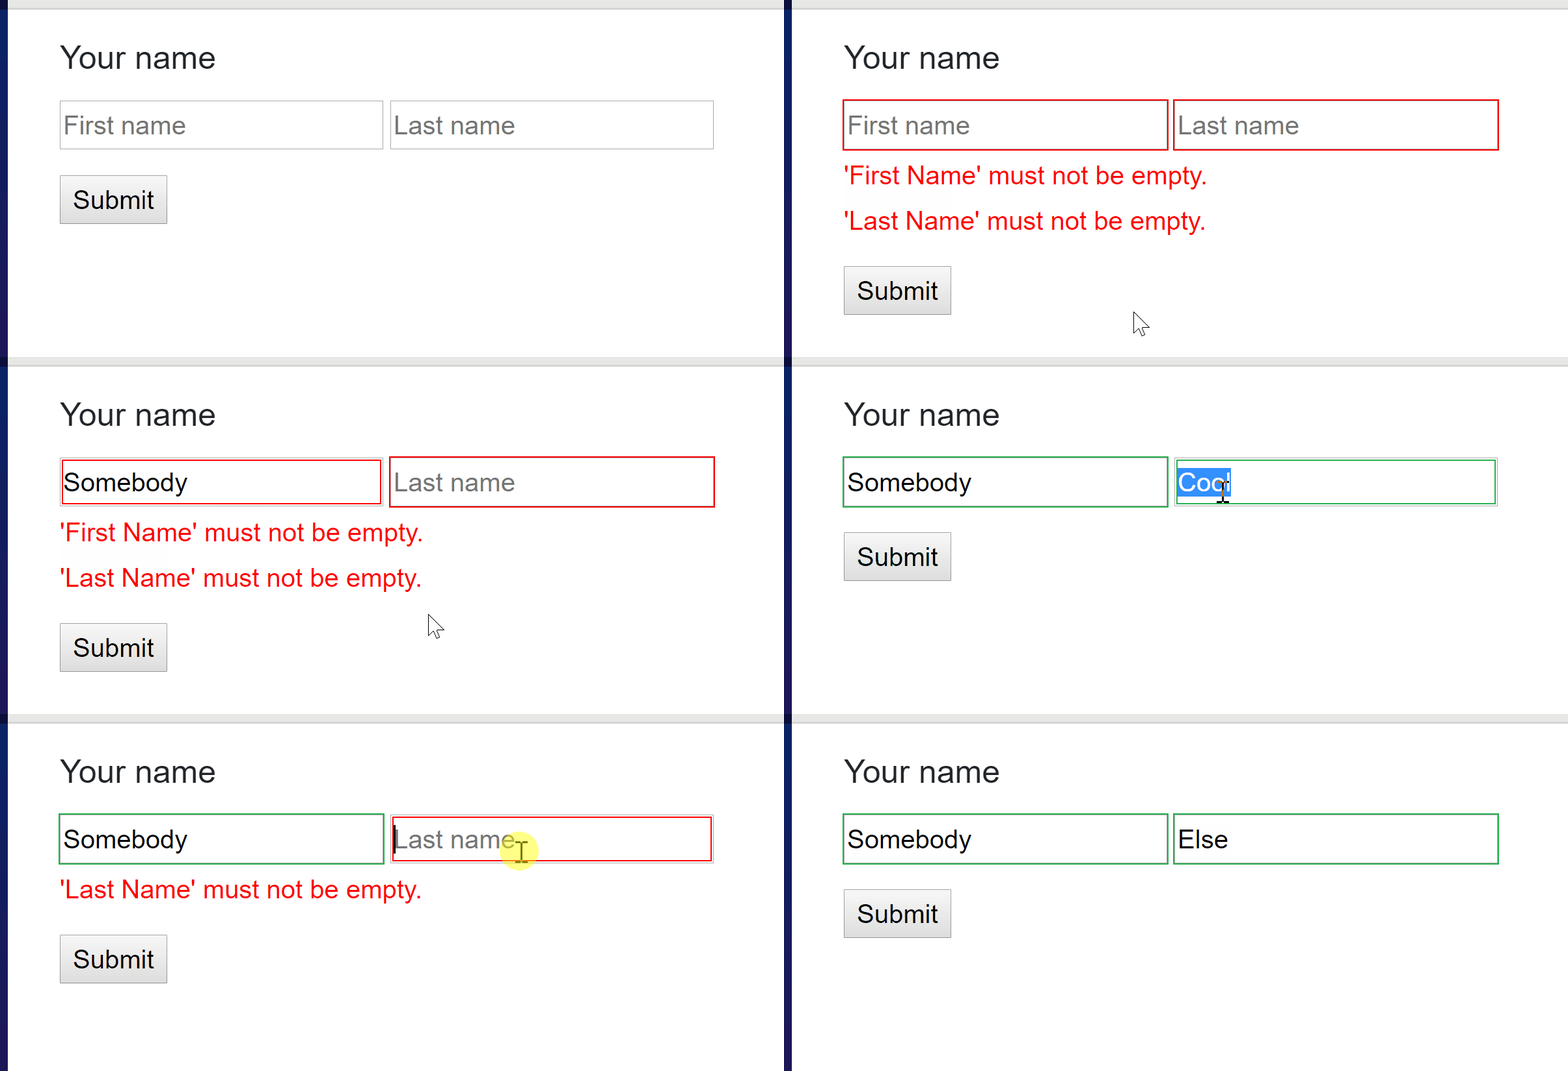
This uses Blazor’s built-in EditForm, InputText, and ValidationMessage components to track the state of the editing process and display any validation error messages. Here’s how this looks:

How it works
So we’ve got FluentValidation rules working with Blazor – but how? The answer is the <FluentValidator> component. This is not built-in to Blazor, but rather is a quick example I’ve made to show how you can do this integration. The code and explanation for <FluentValidator> is later in this blog post.
Validating child objects
What if each Customer also has an Address, and we want to validate the properties on that child object? For example, update the Customer class to:
public class Customer
{
    public string FirstName { get; set; }
    public string LastName { get; set; }
    public Address Address { get; } = new Address();
}

public class Address
{
    public string Line1 { get; set; }
    public string City { get; set; }
    public string Postcode { get; set; }
}
… and update the validation class to:
public class CustomerValidator : AbstractValidator<Customer>
{
    public CustomerValidator()
    {
        RuleFor(customer => customer.FirstName).NotEmpty().MaximumLength(50);
        RuleFor(customer => customer.LastName).NotEmpty().MaximumLength(50);
        RuleFor(customer => customer.Address).SetValidator(new AddressValidator());
    }
}

public class AddressValidator : AbstractValidator<Address>
{
    public AddressValidator()
    {
        RuleFor(address => address.Line1).NotEmpty();
        RuleFor(address => address.City).NotEmpty();
        RuleFor(address => address.Postcode).NotEmpty().MaximumLength(10);
    }
}
As you can see, FluentValidation uses the SetValidator API to reference one validator class from another. To create a UI for this, you could update your <EditForm> to:
<EditForm Model="customer" OnValidSubmit="SaveCustomer">
    <!-- Leave the rest here unchanged -->

    <h3>Your address</h3>
    <div>
        <InputText placeholder="Line 1" @bind-Value="customer.Address.Line1" />
        <ValidationMessage For="@(() => customer.Address.Line1)" />
    </div>
    <div>
        <InputText placeholder="City" @bind-Value="customer.Address.City" />
        <ValidationMessage For="@(() => customer.Address.City)" />
    </div>
    <div>
        <InputText placeholder="Postcode" @bind-Value="customer.Address.Postcode" />
        <ValidationMessage For="@(() => customer.Address.Postcode)" />
    </div>

    <p><button type="submit">Submit</button></p>
</EditForm>
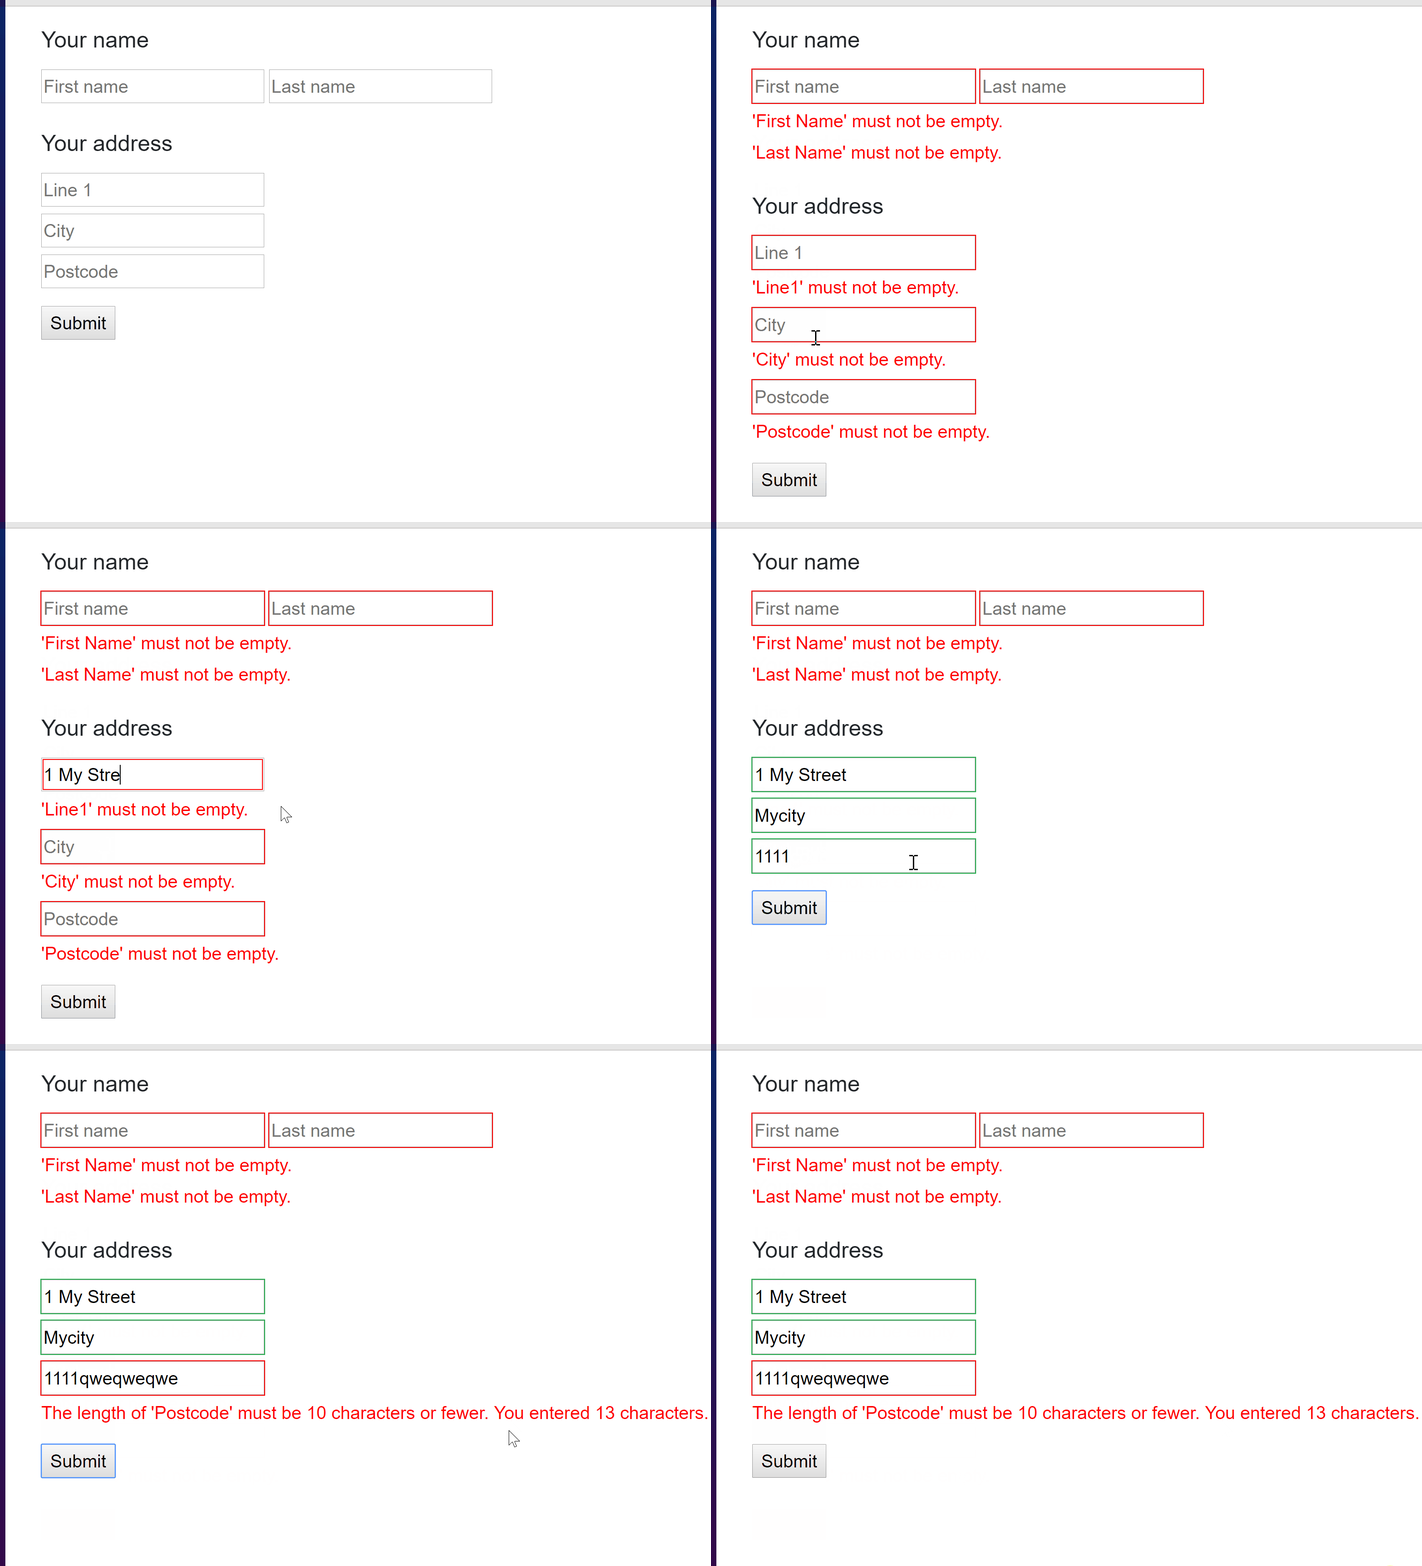
… and you get:

Validating collections
Let’s consider a more advanced scenario. Each Customer has a set of PaymentMethod objects. They must have at least one. PaymentMethod instances can be of different types, and the validation rules in effect depend on the type. To represent all this, you could add the following property to Customer:
public List<PaymentMethod> PaymentMethods { get; } = new List<PaymentMethod>();
… and define PaymentMethod with:
public class PaymentMethod
{
    public enum Type { CreditCard, HonourSystem }

    public Type MethodType { get; set; }

    public string CardNumber { get; set; }
}
To configure the validation rules, update CustomerValidator’s constructor to add:
RuleFor(customer => customer.PaymentMethods)
    .NotEmpty()
    .WithMessage("You have to define at least one payment method");
RuleForEach(customer => customer.PaymentMethods)
    .SetValidator(new PaymentMethodValidator());
… with PaymentMethodValidator defined as:
public class PaymentMethodValidator : AbstractValidator<PaymentMethod>
{
    public PaymentMethodValidator()
    {
        RuleFor(card => card.CardNumber)
            .NotEmpty().CreditCard()
            .When(method => method.MethodType == PaymentMethod.Type.CreditCard);
    }
}
As you can see, RuleForEach applies to each entry in a collection, and When lets you apply rules conditionally based on other properties. In this example, the CardNumber property has to be valid a credit card number, but only when the MethodType is CreditCard.
Creating a list editor in Blazor is pretty simple. Generally you just @foreach over each item in the list to display it, plus offer an “Add item” button and “Remove item” buttons. For example, add the following inside the <EditForm>:
<h3>
    Payment methods
    [<a href @onclick="AddPaymentMethod">Add new</a>]
</h3>
<ValidationMessage For="@(() => customer.PaymentMethods)" />

@foreach (var paymentMethod in customer.PaymentMethods)
{
    <p>
        <InputSelect @bind-Value="paymentMethod.MethodType">
            <option value="@PaymentMethod.Type.CreditCard">Credit card</option>
            <option value="@PaymentMethod.Type.HonourSystem">Honour system</option>
        </InputSelect>

        @if (paymentMethod.MethodType == PaymentMethod.Type.CreditCard)
        {
            <InputText placeholder="Card number" @bind-Value="paymentMethod.CardNumber" />
        }
        else if (paymentMethod.MethodType == PaymentMethod.Type.HonourSystem)
        {
            <span>Sure, we trust you to pay us somehow eventually</span>
        }

        <button type="button" @onclick="@(() => customer.PaymentMethods.Remove(paymentMethod))">Remove</button>

        <ValidationMessage For="@(() => paymentMethod.CardNumber)" />
    </p>
}
… where AddPaymentMethod should be declared inside the @code block as follows:
void AddPaymentMethod()
{
    customer.PaymentMethods.Add(new PaymentMethod());
}
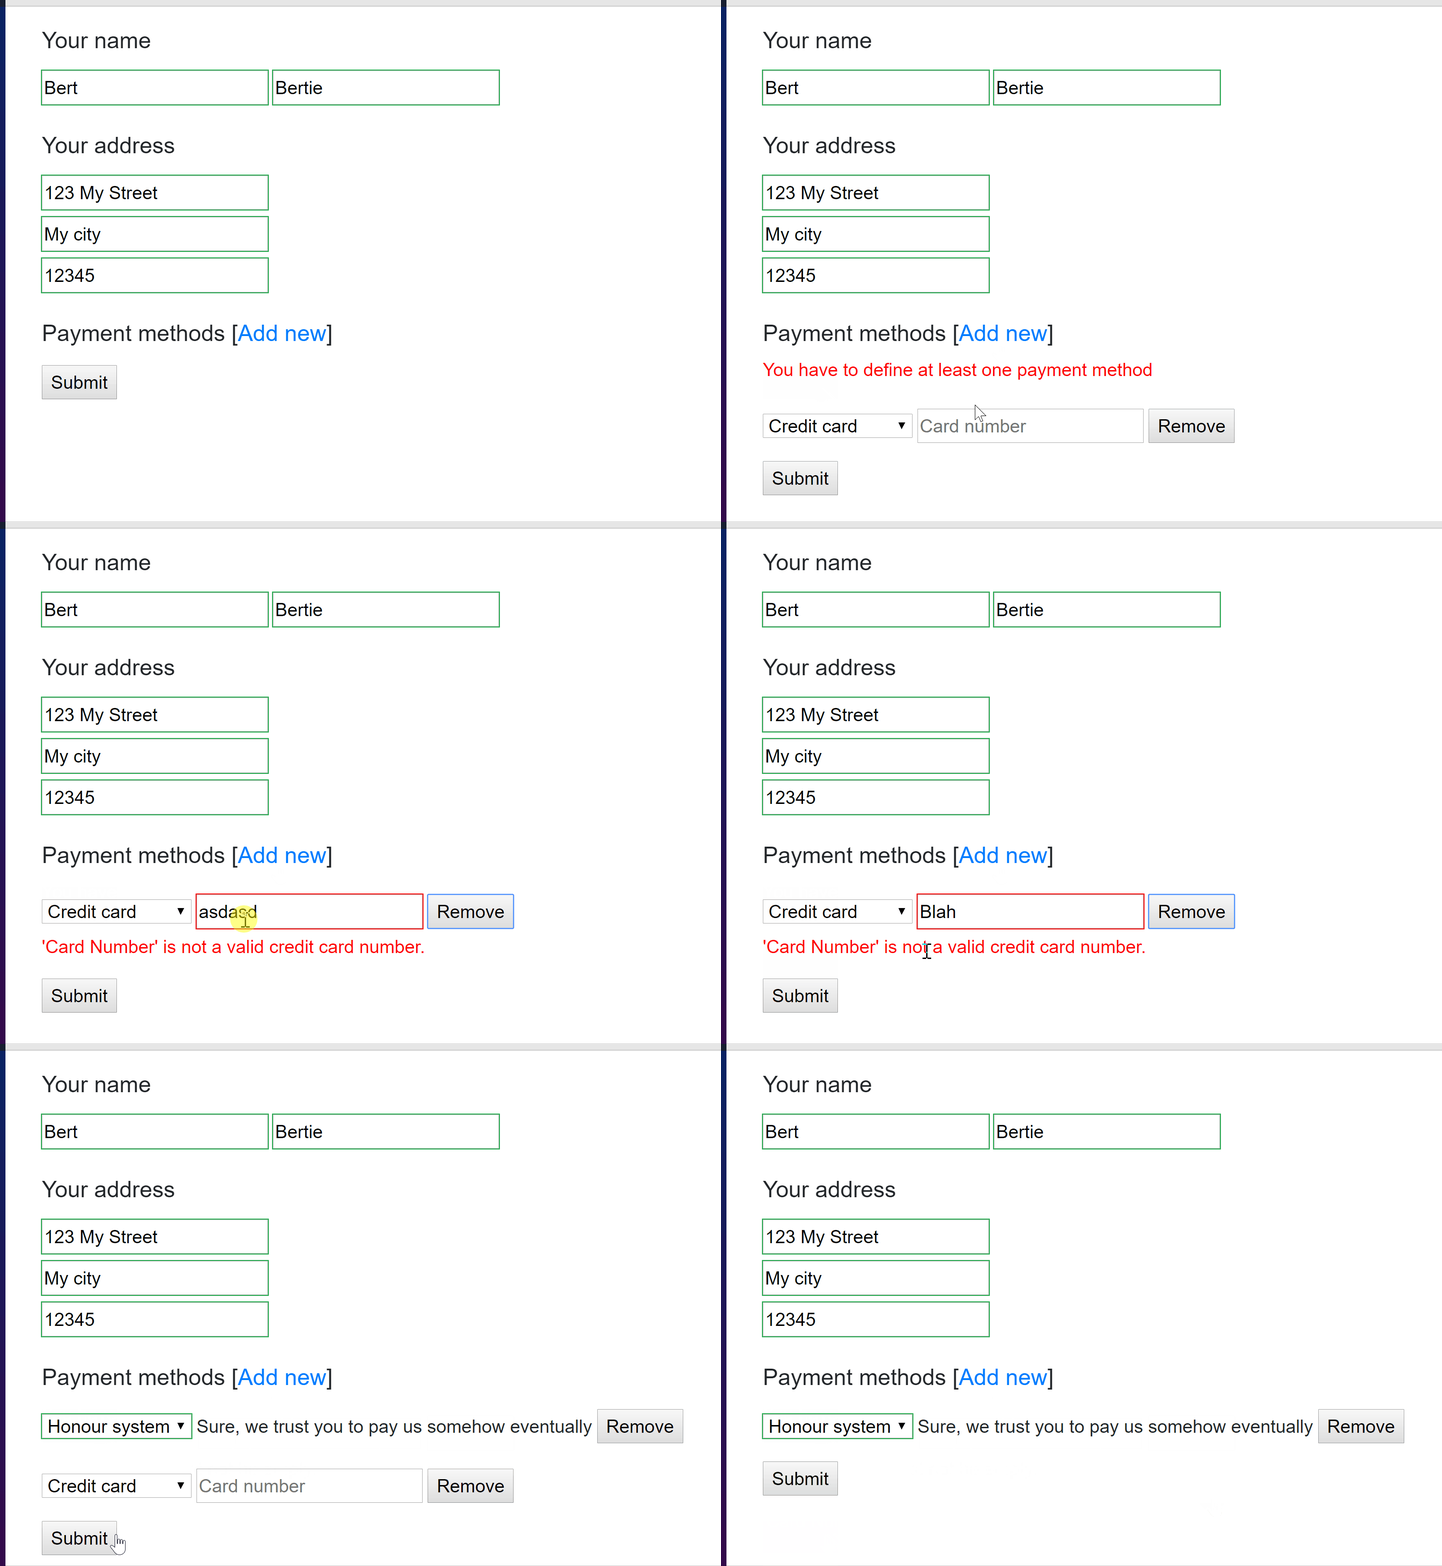
This lets users both add and remove payment methods, and choose a type for each one. Validation rules vary according to the type:

If you want the completed code for this sample, it’s in this Gist. There you’ll also find the source for the FluentValidator component, which is also discussed more below.
Note that this is only a prototype-level integration between Blazor and FluentValidation. There are some caveats discussed below. It’s not something I’m personally planning to extend further and offer support for, but perhaps someone who wants to use it might want to take it further and ship a NuGet package.
Blazor’s forms and validation extensibility
Blazor ships with built-in support for forms and validation. These concepts aren’t welded to the core of Blazor itself, but rather live in an optional package called Microsoft.AspNetCore.Components.Forms. The intention is that if you don’t like any aspect of how this works, you can replace it – either that entire package, or just parts of it.
That optional Forms package contains two main pieces of functionality:
- A system for tracking edits within a form and associated validation messages. This is implemented as components like
<EditForm>,<InputText>,<InputSelect>,<ValidationSummary>, and so on. This isn’t itself tied to any particular validation or metadata framework. - The
<DataAnnotationsValidator>component, which provides integration with .NET Core’sSystem.ComponentModel.DataAnnotationslibrary (which is a specific validation and metadata framework).
The example in this blog post continues using items from #1 but completely replaces #2. That is, instead of having <DataAnnotationsValidator> inside the <EditForm>, we created and used a new thing called <FluentValidator>.
What a custom validator component such as <FluentValidator> needs to do is:
- Receive an
EditContextas a cascading parameter - Hook into
EditContext’sOnFieldChangedandOnValidationRequestedevents so it knows when something is happening in the UI - Add or remove validation messages in a
ValidationMessageStorewhenever it wants. There’s no prescribed timing or lifecycle for this, so you can use literally any flow you want, e.g., for asynchronous validation or whatever else.
The implementation I made for FluentValidator does exactly this.
Reflections on the integration code
By far the most complex aspect of <FluentValidator>’s logic is handling the difference between how EditContext identifies fields and how FluentValidation does.
- Blazor identifies fields using an
(object, propertyName)pair, whereobjectis an object reference andpropertyNameis a string - FluentValidation identifies fields using a property-chain string such as
Address.Line1orPaymentMethods[2].Expiry.Month
The reason for Blazor’s approach is to support UI composition. Imagine you wanted to create an <AddressEditor> component. It should be able to receive Address instances from anywhere and edit them with validation. It would be a burden on the developer if they had to somehow pass in property-chain prefixes and combine strings to represent how to locate items within the <AddressEditor> form. It would be especially unpleasant in dynamic list scenarios. The (object, propertyName) system greatly simplifies this, because AddressEditor can simply identify fields as something like (AddressInstance, "Line1") without having to know anything about how the AddressInstance is reached from some parent-level object(s). I’m sure there are advantages to FluentValidation’s approach too. Integrating these two frameworks means being able to translate between the two representations, so that’s what the majority of the complex logic is doing.
Overall, the two biggest caveats with the <FluentValidator> logic I’ve provided here are:
- It doesn’t yet support validating individual fields. Instead, each time there’s an
OnFieldChangedevent, it revalidates the entire object. This is inefficient plus you can see validation messages for fields you haven’t yet edited.- To fix this, we’d need some way to enumerate all the validatable properties reachable from the root object. Then inside the
OnFieldChangedevent, we’d takeeventArgs.FieldIdentifierand translate that into a FluentValidation path chain string by checking which path string corresponds to theFieldIdentifier. Then we could tell FluentValidation only to validate that one property. - Alternatively, FluentValidation could offer another overload to the
ValidateAPI that takes a callback that returnstrue/falsefor each field being considered to say whether or not it should be validated on this occasion.
- To fix this, we’d need some way to enumerate all the validatable properties reachable from the root object. Then inside the
- The async validation experience won’t be great as-is. From the FluentValidation docs, I see that if you have any async rules, then you’re not allowed to call
Validateany more, and must instead callValidateAsync. This returns aTask, so you can’t get the validation results until all the async ones have completed.- To fix this, maybe FluentValidation could have an API that returns the synchronous results immediately, then a series of notifications as each of the async ones complete, so you can keep updating the UI.
It’s completely possible that FluentValidation already has all the integration points needed to do a better job of integrating than I did. If you know I missed something, please let me know!